

Cara Import Data Raster di ILWIS (How to Import Raster Data in ILWIS)
- Aug 24, 2016
- 4 min read
Tujuan:
Mengetahui cara memasukkan data raster khususnya citra Landsat 8 (*.TIFF) di perangkat lunak ILWIS.
Knowing how to import raster data especially Landsat 8 Imagery in ILWIS software.
Data raster adalah data yang terdiri dari piksel-piksel, biasanya berupa citra penginderaan jauh yang digunakan untuk memperoleh informasi spasial baik melalui interpretasi visual maupun interpretasi digital. Data raster yang dapat dimasukan di perangkat lunak ILWIS adalah data dengan format: Arc/Info ASCII, Arc/Info .E00, Compuserve-GIF, Erdas-GIS, Erdas-LAN, IDA image, Idrisi map, ILWIS ASCII, Paintbrush-PCX, TIFF, dan Windows bitmap.
Raster data compound with many pixel inside, usually formed as satellite images, which used to resulting spatial information based on visual interpretation or digital interpretation. Raster data format that could be read by ILWIS are: Arc/Info ASCII, Arc/Info .E00, Compuserve-GIF, Erdas-GIS, Erdas-LAN, IDA image, Idrisi map, ILWIS ASCII, Paintbrush-PCX, TIFF, dan Windows bitmap.
Landsat 8 hasil unduhan dari USGS (http://glovis.usgs.gov/) memiliki format data *.TIFF yang dapat dibuka menggunakan perangkat lunak ini. Namun, untuk mengolah data tersebut diperlukan konversi menjadi sesuai format ILWIS. Terdapat tiga jenis langkah untuk memasukkan dan merubah data raster ke perangkat lunak ini, antara lain: melalui “menu file” pada jendela utama, “operation tree” atau di “operation-list”. Data mentah (sebelum) dan sesudah dirubah harus berada pada direktori yang sama. Proses memasukkan dan merubah format data tersebut akan dijelaskan pada langkah-langkah dibawah ini.
Landsat 8 Image downloaded from UGSG (http://glovis.usgs.gov/) have *.TIFF data format which could be open in this software. However, this file needed conversion to ILWIS data format so it could be processed. There are 3 types of importing and converting processes, named: “file menu” in the main window, in the “operation-tree”, or in the “operation-list”. Raw and converted data must be placed in the same directory. Importing and converting data format will be explained in the following steps.
A. Memasukan dan merubah data raster *.TIFF melalui “menu file”
A. Importing and Converting raster data *.TIFF through “file menu”
Buka perangkat lunak ILWIS yang ada di komputer anda.
Open ILWIS software in your computer

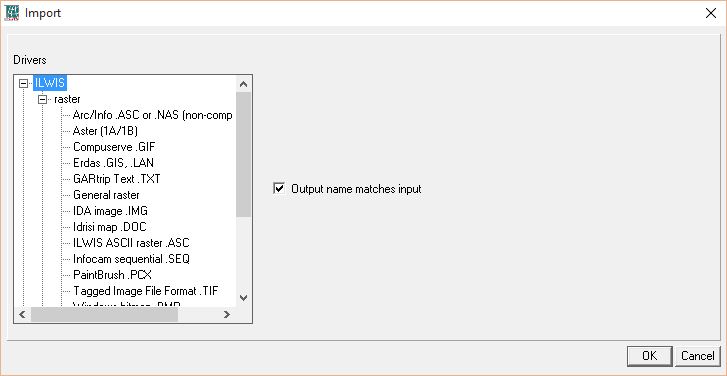
Klik “file” pada jendela utama dan pilih “import”
Click “file” in the main window and choose “import”

Terdapat pilihan ILWIS, Geospatial Data Abstarction Library (GDAL), Postgres, Aster, ActiveX Data Objects (ADO), dan OGC. Sesuaikan dengan kebutuhan anda, pada kasus ini pilihlah ILWIS à raster à Tagged Image File Format (TIFF).
There are some choices, named:Geospatial Data Abstarction Library (GDAL), Postgres, Aster, ActiveX Data Objects (ADO), and OGC. Match with your need. In this case, choose ILWIS à raster à Tagged Image File Format (TIFF).
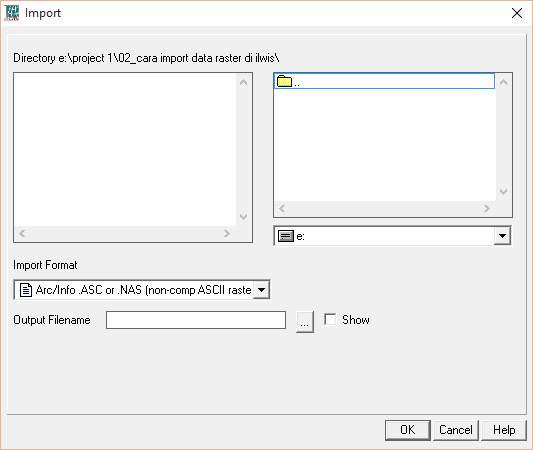
Pilihlah file yang akan dimasukan dan dikonversi pada opsi “input” dengan mencarinya pada folder dimana terdapat data raster TIFF yang anda butuhkan. Pastikan folder sebagai tempat penyimpanan data mentah dan data hasil konversi sam, misalnya: “02_Cara Import Data Raster di ILWIS”. Kemudian klik “open”.
Choose file that will be imported and converted in the “input” option. Then, look for it in the directory where your TIFF raster data belong. Make sure that folder keeping raw data and converted data is same, such as: “02_Cara Import Data raster di ILWIS”. Then klick “open”.


Hapus tanda centang pada “output name matches input” sehingga nama file hasil konversi tidak sama dengan nama file mentah.
Uncheck in the option “output name matches input” to make the converted data won’t be same with the raw data.

Pilih opsi “output” untuk menyimpan hasil konversi. Kemudian beri nama file hasil konversi, misalnya “Landsat8_B5_TIFF”, pada kotak “file name” dan perhatikan pada kotak “save as type”, file tersebut akan berubah menjadi “ILWIS object (*.mpr)”. Kemudian klik “save”.
Choose “output” option to save the resulted data. Then, name the file, such as “Landsat8_B5_TIFF”, in the “file name” box and look at the “save as type” box, the file will be converted into “ILWIS object (*.mpr)”. Then click “save”.

Klik “ok” pada kotak dialog Import.
Click “ok” in the Import dialog box.

Tunggu sampai proses konversi selesai dan muncul 4 jenis file (*.csy, *.dom, *.grf, dan *.mpr) dengan nama “Landsat8_B5_TIFF” pada jendela utama ILWIS. File format *.TIFF sudah berhasil diimpor dan dikonversi menjadi format data ILWIS (*.mpr).
Wait until converting process finished and appear 4 file types (*.csy, *.dom, *.grf, and *.mpr) with the name “Landsat8_B5_TIFF” in ILWIS main window. *.TIFF file format has been imported and converted into ILWIS data format (*.mpr)


B. Memasukkan dan merubah data raster *.TIFF melalui “operation tree”
B. Importing and converting raster data *.TIFF through “operation tree”
Lihat jendela “Operation-Tree”. Klik ganda pada “Import/Export”. Klik ganda pada “Import General Raster”. Kemudian kotak dialog “Import” akan terbuka.
Look at the “Operation-Tree” window. Double click in the “Import/Export”. Double click in the “Import General Raster”. Then dialog box “Import” will be opened.

Pilih “Import Format” menjadi “Tagged Image File Format .TIF”. Pilih data raster *.TIFF yang akan dikonversi menjadi data *.mpr. Ketik nama file, misalnya “Landsat8_B5_TIFF_OperationTree” pada kotak “Output Filename”. Pastikan sudah terbuat folder penyimpanan yang sama antara data mentah dan data konversi. Klik “Ok”.
Choose “Import Format” then change into “Tagged Image File Format .TIF”. Choose raster data *.TIFF which will be converted into *.mpr data. Name the file, such as: “Landsat8_B5_TIFF_OperationTree” in the “Output Filename” box. Make sure on the saving folder that must be the same between raw data and converted data. Click “Ok”.

Tunggu proses konversi selesai. Hasilnya akan ditampilkan di jendela utama ILWIS seperti pada proses “menu file” sebelumnya.
Wait until converting process finish. The result will be presented in the ILWIS main window like the previous process of “file menu”.

C. Memasukan dan merubah data raster *.TIFF melalui “operation-list”
C. Importing and converting raster data *.TIFF through “operation-list”
Klik “Operations” pada menu utama ILWIS. Pilih “Import/Export”. Klik “Import”. Kemudian kotak dialog “Import” akan terbuka.
Click “Operations” in the main menu of ILWIS. Choose “Import/Export”. Click “Import”. Then dialog box of “Import” will be opened.

Tahap selanjutnya sama dengan langkah nomor 2 hingga nomor 3 pada proses “operation tree”.
The next step will be same with “operation tree” process in the number 2 and 3.
***Semoga Bermanfaat***
Comments